catsittingstill: (Default)
I have successfully glued on seat rail extensions to the backs of the seat rails.  They are a lighter color, but that will probably change somewhat over time.  The join, which is not particularly neat, will be mostly hidden by the caning of the seat, and removing about three inches of each front rail went better than I dared hope, though not perfectly.

I used an exacto knife to cut across the rail, and a chisel to pare back to the cut, repeatedly, until I was paring the last paper-thin shavings of wood off the dookieschmutz below.  In this process I slipped at one point, and gouged the fiberglass.  I will have a picture later, if it came out.

The gouge had to be repaired, but repairing fiberglass is pretty straightforward.  You sand it all off to the bare wood, cut a fiberglass patch that overlaps the remaining fiberglass by an inch all the way around, epoxy it down, sand the edges so they aren't bumpy anymore, put a second coat of epoxy on, and then to the varnish when the epoxy is cured.  Happily, it turns out that I don't have to wait for a full chemical cure with this epoxy-varnish combination; 24 hours seems to be good enough.

I also had to sand the dookieschmutz off the hull, which went better than I had dared hope.  I got pretty much all of it off.  The paring and sanding took about five hours, which was less than I'd feared.  Varnishing the sanded bits was straightforward enough, and I coated the seat rail extensions and the back thwart first with epoxy and then with two coats of varnish.

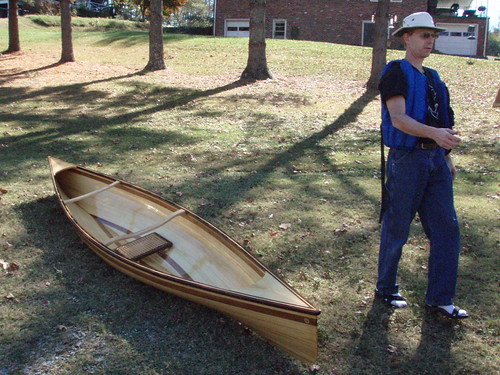
This morning I drilled the holes and screwed seat and back thwart in place.  I am very happy with how the back thwart came out; I think it has a much more graceful curve than the old one, and I think the way I carved the part that contacts the paddler's back will be much more comfortable than the plain roundover I used on the old one.  We shall see tomorrow morning, because Vonda will be coming at 7:30am to help me put the boats on the car so we can go paddling.

Wish me luck :-)
catsittingstill: (Default)
Folks may remember last fall I was disappointed to find I had put Constance's seat in the wrong place. With a paddler in the seat, she was nose-heavy, which made her harder to steer and meant she tended to "weathervane" or turn into the wind, which is sometimes a good thing, but sometimes not.

I solved the problem temporarily by filling a couple of two-liter bottles with water and putting them in the far stern of the boat. You'll recall I mentioned this in the post with the pictures of Launch Day.

Why algebra is useful. )

This means gluing on extensions to the rails the seat rests on, because they don't go that far behind the seat. It also means making a back thwart with considerably more curve to go almost three inches farther back than Constance's original back thwart. (The back thwart runs right behind the seat and the paddler leans back against it a little to support her lower back; if I don't move it back, the paddler will be bent like a very bent unhappy person. However the back thwart is screwed down to knees I epoxied into the boat, which would be a pain to remove in the time I have. Solution: move the *middle* of the back thwart three inches back; leave the ends where they are.  The boat is wide enough that I can get away with this.)

So I patterned and cut the new thwart yesterday. I fitted and shaped and sanded (and dampened and re-sanded with 120 grit and re-dampened and re-sanded with 220 grit) the thwart today, and I cut and shaped the seat rail extensions and cut the slots in them where the caning on the underside of the seat needs extra room. And just now I finally found the oomph to epoxy them in (let's hope they don't slip) and paint the back thwart with epoxy to seal the pores.

And tomorrow I shall cut the slots for the front cane, hopefully figure out some way to remove the extra four inches or so of seat rail that sticks out ahead of the seat in an unsightly way, drill the holes for seat and thwart installation and run a small patch test to see if I can varnish yet. Also there is some damage to the varnish on the gunwales where I slid her across the rack on the back porch, and I will fix that. Plus I need to think about carpeting or padding that rack when I have time or I will always be touching up the gunwales.

But today I got all the boat stuff done that I planned.  Not all the other stuff, mind you, but all the boat stuff.  Go me.

Canoe Day

Nov. 11th, 2010 07:28 pm
catsittingstill: (Default)

Remember when I asked a couple of days ago how many more good canoeing days there were likely to be in 2010?

Well, one more at least.

I went canoeing this afternoon. I took the extra weight to load in the boat (wound up carrying pretty much all of it behind me; I'm not sure why that looked right to me at the time I loaded the boat, but it did. I was carrying 45 lbs in back and at a guess 5 lbs in front besides me (180 in gear.) Had no problem handling the boat but when I went to wash her off afterwards (I'm taking her to show Martin's canoe building class tomorrow, and want her to look her best) the watermarks came to 5 inches of the (top of the) gunwales. She didn't seem that low in the water at the time, but it's something to think about.

So I took the camera this time; I don't know if you will be glad, or sorry, because I just fired away at anything that looked interesting to me.

Read more... )
catsittingstill: (Default)

It was cold and nasty all last week.  Today it hit the low 70s.  I had told Martin I would bring Constance to show his shop class (they're building a canoe) today, but at 7:30 am I called and begged off.  Because... well, how many more canoeing days are there likely to BE in 2010?  I can show the kids the canoe when it's pouring down rain.

Canoes and Canoe-loading ) 

I got home planning to collapse when a lucky chance (a League Member had called to ask if we would have a Board meeting before the League Meeting tonight and Kip passed the message along) reminded me that I mustn't in fact collapse--indeed it was incumbent on me to get the canoes off the car (or tie them down better but removing them was faster) and go to the League meeting.
League Meeting )

And--

I want to build another canoe.  I may have mentioned this.   But.  I have Patience on the back porch and Constance in the boatshop.  If I just move Constance and her cradles onto the back porch it will no longer be possible to use the back porch for anything else.  Like, grilling.  Did I mention Kip loves grilling?

So, my clever plan.  I will build a canoe rack so I can stack the canoes one over the other on the back porch, take up no more back porch surface than Patience is taking now (well, a little more) and have my boatshop back.  I designed a rack, ran down to consult Steve at the hardware store yesterday, picked up wood and screws and some carriage bolts, and last night went over to Steves where we cut the notches for all the T laps.  (I'm using lap joints, since they're quite a bit easier than mortise-and-tenon but still provide some rigidity.)  Steve used his circle saw to cut the edges, I whanged most of the waste out with a chisel, and then Steve cleaned out and squared up the bottoms of the notches with his router.  Now that I see how he did it it doesn't look that hard.  Just time consuming.

Then this morning before canoeing, I cut the end laps on the pieces that will fit in the notches.  I cut six end laps but have two to go.  The laps are really substantial; it takes me about 20 minutes to make the pair of cuts with the Ryobi saw.  Of course part of that is that I have to be careful and cut right to the lines.

Anyway, I think tomorrow I will have a canoe rack.  With spaces for 3 canoes!  Putting off the necessity of making a canoe shed for a couple of years at least.
catsittingstill: (Default)
You are invited to Constance's Virtual Boat Launch Party, this post, whenever is convenient for you.

This is Constance.
Constance 0
Today is her birthday. She is a Wee Lassie II, stretched to 13 feet 9 1/2 inches long, (3 1/2 inches longer than normal) though she gets an extra inch and a half or so on top of that because of the way I did her gunwales. Her hull is white pine with a double butternut stripe, covered inside and out with four ounce fiberglass.

The person in the photo is Steve, my friend from the hardware store who drilled out the broken screw and removed the broken drill bit from the front thwart. When I found out he canoed I knew who my first victim--I mean companion--should be.

Read more... )


catsittingstill: (Default)
First off, we haven't heard back anything yet about the stolen laptop.  However Pocketnaomi and Cflute have kindly donated funds that will make replacing it much more feasable, and I would like to publicly thank them for their generosity.   We are going to hold off for a week or two to see if the stolen laptop comes home first, for obvious reasons (brave computer having walked 100 miles to get home confronts its replacement on the doorstep---awkward...)

Also... I think Constance is done.  Once the varnish dries, I mean.

I thought caning the seat would be quick and I guess it was, sort of.  For not very quick values of "quick."  Which is to say I started caning at about 5:30 last night and caned (with some interruptions like dinner and stuff) until about 11:00 pm and then started again about 9:00 am this morning and finished around 1:00 pm.  The first courses go pretty fast, because they're just laid down over each other, but I had to keep going back to the boatshop and whittling more pegs to hold the ends of the cane in the holes (until you have a "stitch" of cane next to a loose end to tie to you use a peg to keep the loose end from slipping out of the hole.)  But on course four you start weaving--and you have to be a little careful about that, because there's a fair amount of friction (you use petroleum jelly to lubricate the cane so it won't melt from the friction.)  So you don't want to pull it through too fast.  And courses five and six are woven diagonally and by course six things are pretty tight.  And if you get a twist in the cane (it has a rounded top side and a flat bottom side) you have to pull it out to untwist it.  So it takes a while.  It would take even longer but I don't do the binder cane finishing step some of the books recommend (a line of cane that covers the holes in the wood, "stitched" in place from underneath, using its own ends.)  My problem with that is I think my cane is a little larger than the stuff the author of the book is using and four passes of cane is about all I can get through the holes before they're too full.  I left off the binder cane for Patience's seat and it has worked fine for years so I'm not going to worry.

Then I took my caned seat out to the boatshop and laid it over the rails I epoxied in a few days ago.  I discovered that the line of "stitches" on the bottom meant that I had to cut little slots in the rails for the stitches to lie in; I just used a knife to cut a straight line at each edge of the slot and removed the wood between the lines with a 1/4 inch chisel.  I wasn't terribly neat about it but it will be hidden under the seat anyway.

Then I laid the seat with the caning in the slots and marked where the screw holes would go.  The screws have to go into the thicker parts of the rails (more toward the center of the boat) so as to not risk drilling into / screwing into the hull itself.  When I had the locations marked, I took the seat out and drilled the actual holes with the drill press, which is much easier than doing it by hand.  These are wood screws of course, with the three widths of hole (the part with threads needs to be as wide as the shaft between the threads, then near the head of the wood screw the shaft of the screw "swells out" to fill the threads and needs to be drilled out wider, and then the top of the screw has kind of a conical section for a head, narrower at the bottom of the head than at the top.  They sell special combination bits that try to drill all three widths at once but different lengths of #8 screw (#8 is the width) have different lengths of thicker shaft so I always end up having to drill these holes in several stages.  For the thwarts I drilled them when they were actually clamped in the boat so I had to use the hand drill--using the drill press for this was much easier.

Then I took the seat, laid it in the correct place on the rails, and drilled into the rails using the predrilled holes as guides, but using the hand drill.  To weight the seat down so it wouldn't shift while I was drilling, I used the router bag with the router in it.  It was about the right size and worked fine.  Then I used a stainless steel woodscrew to cut threads into the wood and replaced it with brass screws. 

The walnut was absolutely the right choice for the seat--it looks great against the butternut and white pine of the hull.

After taking the seat out again, I put my second coat of varnish on the inside of the canoe this afternoon, paying special attention to the screw holes and the newly cut slots.  I have thought it over and am going to go with 2 coats for now.  There are a couple of reasons for this.  One is that every coat of varnish adds more weight, (a pound a coat is what the books say, though I have coated 2 times, inside and out, with a 32 ounce can of varnish and I still have some left over) and another is that varnish is expensive.  Not crazy expensive, but that 32 ounce can was 18$ and, well, we have a computer to replace, you know how it is.  Two coats is kind of a minimum, but Constance should get a new coat every year as regular maintenance so two should be okay.

I put a second coat on the thwarts too.

Tomorrow at 1pm I'm going to launch. :-)  I wonder how Constance will compare with Patience...

Profile

catsittingstill: (Default)
catsittingstill

February 2024

S M T W T F S
    1 23
45678910
11121314151617
18192021222324
2526272829  

Syndicate

RSS Atom

Most Popular Tags

Style Credit

Expand Cut Tags

No cut tags
Page generated Jul. 4th, 2025 05:39 pm
Powered by Dreamwidth Studios